
Showing posts with label photography. Show all posts
Showing posts with label photography. Show all posts
Wednesday, July 25, 2012
Sunday, July 1, 2012
Polaroid Z2300
Polaroid, has introduced the latest generation of instant cameras that no longer rely on film, but digital media. Polaroid Z2300, a small pocket camera that brings 10-megapixel sensor that the images can be saved to SD memory or directly printed on special paper measuring 3 x 2 inches or 7.6 x 5 cm. The time needed to print a photograph is about 30 seconds.
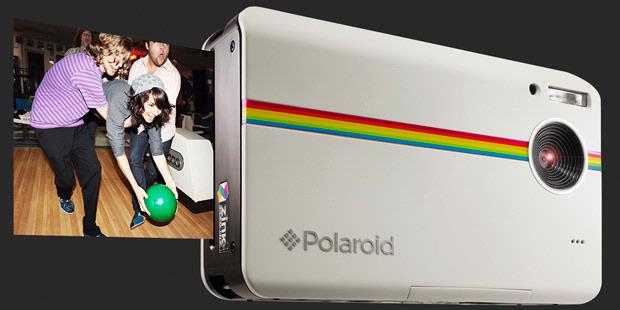
If desired, users can also record HD video (720p) with this pocket camera. Polaroid Z2300 can already be ordered for $ 159 dollars through the Polaroid site. The paper needed to print photos for Polaroid priced at 14.99 U.S. dollars for the package contains 30 sheets and 24.99 U.S. dollars for the package contains 50 sheets. The plan, this camera will go on sale in stores in August.
Tuesday, May 15, 2012
History pioneer of photography
The two founders of the company and the inventor of Kodak, George Eastman (left) and Thomas Edison. Eastman Kodak Company was founded in 1880.

Film and camera manufacturers USA is headquartered in Rochester, New York. Kodak began marketing the first flexible roll films in the world in 1888. In its heyday Kodak employs about 60,000 people.

Kodak managed to popularize photography by producing a hand-held camera, named Brownie for U.S. $ 1 in 1900. Kodak is also listed as one of the famous brands in the 21st century. Production cameras used to capture the first human landing on the moon in 1969.

Leica M8 camera, which was launched in 2006 juxtaposed with M7 analog cameras. M8 camera is the first digital camera that was developed from a camera which is usually used among well-known journalists and cameramen.

A Kodak technician shows the images attached to a silicon sensor. Sensor technology can increase light sensitivity.

Source: BBC
Leica Camera History
Leica was founded in 1849, known as the company's and microscope lenses. One of the engineers, Oskar Barnack, who work in the microscope, loves photography and has long wanted a compact camera.

When the size is very large and heavy cameras. He designed a compact camera using 35mm film which is widely used to make a Hollywood movie. Barnack make a tiny camera on the 1908-1923 and many shots from this period that still survive today.
His boss welcomed this idea and then decided to make the Leica camera unit 25 Series 0, as well as to gauge market reaction. Series 0 received a mixed reception, but the Leica to take risks and produce 1,000 units A Leica in 1925. The market welcomed the Serie A in 1932 and Leica to produce no less than 90,000 units of this series.
Source: BBC
Source: BBC
Leica classic, most expensive camera in the world
Leica camera prototype made in 1923 sold for 2.16 million euros, at an auction in Vienna, Austria. Leica only make 25 units of Series 0, which later developed into Series A compact camera that uses 35mm film.
Sales value to make this camera a camera in the world's most expensive. Austria started the auction at the price of 300,000 euros, and organizers expect this camera will sell in the range of 600 000 euro.
But when the auction ends, worth about 1.8 million euros. Taxes and other costs to make the winning bidder, who did not reveal his true identity, had to pay 2.16 million euros to get this classic camera.
The high price of Leica cameras showed that the higher interest of classic cameras. The highest price for the Leica 0 series is 1.32 million euros. Whereas in 2007, it costs only 336 000 euros.
Wednesday, December 7, 2011
Photo Tips: Landscape Photography
When shooting in cold weather, or extreme conditions such as snow and sleet, it's important not to change your lenses outdoors. You never want to get moisture or condensation inside the camera body.
After you’ve made the image you have in mind, walk or drive closer to the subject and try again. Proximity will make the subject strike you in a different way.
When your subject is of indeterminate size—a mountain, a body of water, a snowscape—add a sense of scale by including something of known size, such as a person, a car, a tree, or an animal. This helps viewers understand what they’re looking at.
Rain can damage or ruin your camera, but it can also make for great pictures. Carry a good umbrella, a box of plastic bags, perhaps a small tarp (some are specially made for photography), and a towel with which to dab your equipment.
The best building shots balance light from three different sources: skylight, streetlights, and lights from within the building.
Photograph animals where they live. A favorite composition of photographer Michael Melford’s is an environmental shot showing the animal surrounded by its habitat—rather than the usual tight shot taken with a long lens.
Nighttime photographs almost always require long exposures. This means using a tripod to hold your camera perfectly still while the shutter is open, though you can sometimes find a solid surface to rest your camera on and trip the shutter with the camera’s self-timer.
Look at the scene through different lenses, from wide-angle to telephoto, and think about how each lens affects it.
Add layers to your composition—that is, multiple elements beyond the main subject, such as foreground and background elements.
Take time to explore. Part of the joy of landscape photography is being out in nature. Wander around and get a sense of the place. It will take time and patience to discover the best way to show what makes it unique.
Get out (to shoot) before sunrise and stay out after sunset—the times when the light is best. Use the harsher light of midday to scout.
In unusual or mixed lighting conditions, or with subjects of one predominant color, try to manually set your color balance.
If shafts of sunlight penetrate the clouds, be careful not to take your reading from them because they will fool the meter.
If you don’t have a waterproof case, use sealable plastic bags to keep your equipment dry. Never put hot silica gel in them.
If you are staying in one place for several days, check out the long-range weather forecast and plan your shoots around the weather that is best for specific subjects.
When shooting aerial photography, stay pretty low, usually at about 1,000 feet (300 meters) above the ground. High equals hazy in aerial photography.
Find leading lines. Landscapes are full of linear elements— roadways, train tracks, fencerows, ridgelines, tree branches. Use these lines to lead the eye into your picture. Leading lines are most effective as diagonals.
Tuesday, November 22, 2011








Sunday, November 20, 2011
Canon EOS-1DX
Canon EOS-1DX has 3 processor Digic as well as including Dual Digic 5 +. Digic 5 + processor has a speed 17 times more powerful than the Digic 4 processor Reduction of the resolution to 18MP from the previous model is claimed to be able to produce quality images more qualified. Speed of image capture by the EOS-1DX is 14 fps.

Saturday, November 12, 2011
The Most Expensive Photograph in the World fetched $4.3 million
This landscape shot of the Rhine River just fetched $4.3 million at auction. Is this photo of the Rhine River on a cloudy day worth more than $4.3 million? One well-to-do collector seems to think so.

Source: Time

the image, which captures the silvery river, planked on either side by lush green grass under an overcast sky, became the world’s priciest picture on Tuesday when it was auctioned at Christie’s for a price of $4,338,500.
It's called "Rhein II" and was photographed by Andreas Gursky, and it sold on Tuesday night for $4.3 million at Christie's. That easily broke the previous record set by Cindy Sherman's "Untitled #96" which sold at a $3.89 million price point in May.
Source: Time
Tuesday, August 9, 2011
Nikon D5100
vari-angle LCD monitor

The D5100 incorporates an approx. 921k-dot, 7.5-cm (3-in.), wide-viewing-angle, vari-angle LCD monitor that realizes comfortable movie and Live View shooting. The LCD monitor opens horizontally from 0° to 180° and flips up and down from +180° to -90°. Highly improved operability when shooting from a high or low angle allows you to shoot with a stable posture while confirming composition even if shooting from ground level. You can enjoy new, creative expressions by shooting from various angles and discover unique points of view.
full HD movie-recording function: D-Movie
The D5100 offers high-image-quality full HD movie recording at 1,920 x 1,080/30p. You can shoot creative movies easily, not only taking advantage of shallow depth of field, high ISO sensitivity performance and a variety of interchangeable NIKKOR lenses of digital SLR cameras but also utilizing the vari-angle LCD monitor and special effects mode of the D5100.
Contrast-detect AF is possible and if you set full-time-servo AF (AF-F) for focus mode and subject-tracking AF for AF-area mode, focus point tracks even a moving subject continuously and three-dimensionally.
Optional Stereo Microphone ME-1 compatible

In addition to monaural recording with the built-in microphone, the D5100 lets you record stereo sound with optional Stereo Microphone ME-1. Using Stereo Microphone ME-1 also reduces noise caused by lens vibration being recorded during autofocus shooting.
Furthermore, you can select the sensitivity level for either the built-in microphone or Stereo Microphone ME-1, choosing from auto, high, medium or low according to shooting conditions. Select low for scenes in louder environments, such as a concert hall; high for quieter environments, with more delicate sounds, such as a murmuring stream.
The D5100's special effects mode lets you enjoy your creative expression by applying striking effects to your movies and still images easily. Just setting the mode dial to EFFECTS and rotating the command dial will give you what you need to achieve impressive images. There are seven options incorporated in the D5100. The result of an effect is displayed on the LCD monitor in real time, therefore you can set the effects while checking the appearance of your image. The special effects mode greatly expands your creative possibilities in combination with the vari-angle LCD monitor.

Tuesday, May 3, 2011
5 Tips for Shooting Dramatic Silhouettes By Dave Johnson
Silhouettes are some of the most iconic elements you can add to your photography repertoire. Let's look at five things you can do to take better silhouettes.
1. Set Up the Scene
The basic idea behind any silhouette is that your subject is dark and underexposed, but set against a bright background. So for the best results, look for situations in which you can take advantage of a lot of contrast. Sunsets are a perennial favorite for silhouettes, but if you get low to the ground and aim upwards, you can get striking results by placing someone (or something) against a bright blue sky. Your options hardly end there; I've seen gorgeous silhouettes set against brightly lit stained glass windows inside churches, for example.
2. Turn Off the Flash
It's critical to expose for the background. We want to keep light off of the subject, so your camera's flash should be off. If your flash tends to fire automatically, you'll want to find the flash setting and turn it off.
3. Expose for the Background, Not the Subject
Most digital cameras are pretty smart and can expose your scene pretty well even in terribly harsh, high-contrast situations. That's exactly what we need to avoid in order to capture a good silhouette, though, so you should outsmart your camera by overriding the automatic exposure control. There are a few ways to do this. If your camera has an exposure lock button, you can point the camera at the bright background and then press the exposure lock. Keeping the button pressed, compose the shot and then take the picture.
Another option is to point the camera at the bright background while in automatic exposure mode and take note of the f/stop and shutter speed. Then put your camera in manual mode, dial in those settings, and compose and take the picture. Whatever you do, don't just compose the photo and take it using auto or shutter or aperture priority, because those settings will average the exposure between the background and subject, and you won't get a silhouette.
4. Keep the Subject in Focus
Focus is something else to consider when you take a silhouette. Depending upon how you frame the shot and what settings you use to set the exposure, your camera might accidentally lock the focus on the background. For your silhouette to have dramatic impact, though, it needs to be sharp. In most cases, fixing this problem is just a matter of ensuring that the focus locks on the subject when you press the shutter release. You might want to check your camera's user guide and make sure that the exposure lock button doesn't also lock the focus, for example. Worst case, you might need to switch to manual focus and set it yourself.
5. Perfect the Silhouette on Your PC
Finally, keep in mind that it's rare to capture a perfect silhouette "in the lens." Most silhouettes will require some touchup in a photo editing program. The most common problem you'll have is that the silhouette isn't perfectly black--you'll still see some color or detail. Fix that with your photo editor's Burn tool. Burn is a brush that darkens the scene wherever you paint. So select the Burn tool (if you're using Photoshop Elements, it's in the second cubby from the bottom of the toolbar) and paint over the subject to remove all trace of color and detail.
Dave Johnson, PCWorld.com
Wednesday, April 6, 2011
New Digital-SLR Camera Nikon D5100
 Nikon Corporation is announce the release of the Nikon D5100, a Nikon DX-format digital-SLR camera equipped with a vari-angle monitor, and a CMOS image sensor and the EXPEED 2 image-processing engine that enable high-resolution rendering and rich expression of tones.
The D5100 is a member of D5000 series. The D5000 was the first Nikon digital-SLR camera equipped with the vari-angle monitor that allows users to enjoy flexible shooting from a wide variety of angles. The camera is also equipped with the D-Movie function that supports recording of full-HD (1920 X 1080p, 30p) movies, as well as a Special Effects mode with which a variety of special effects can be applied to still images and movies.
The D5100 was designed to respond to the needs of a broad range of users, from those using a digital-SLR camera for the first time, to those looking for a camera that allows them to express their individual sense of creativity through still images and movies.
 The D5100 is equipped with the same DX-format CMOS image sensor and EXPEED 2 image-processing engine as the high-end D7000 digital-SLR camera. These features enable capture of high-resolution images with excellent expression of tones. With standard sensitivity settings of ISO 100–6400 and additional increases up to Hi 2 (ISO 25600 equivalent), the camera offers improved capability with shooting under dim lighting, such as in the evening or indoors, and also produces better results with capture of rapidly moving subjects.
 Visibility has been increased with the large 3-inch, approximately 921k-dot high-resolution vari-angle monitor adopted for the D5100. In addition, the range of colors that can be reproduced by the monitor is equivalent to that of the sRGB gamut. Adoption of a side hinge for the vari-angle monitor prevents the monitor from hitting the tripod when it is opened while the camera is mounted on a tripod. The vari-angle monitor opens from 0 to 180° to the side, and can be rotated up to 90° clockwise and up to 180° counter-clockwise when it is open. This enables shooting from a wide variety of angles, from low to high, making even self portraits possible.
 The D5100 is equipped with the D-Movie function that enables recording of high-definition movies (1920 X 1080p, 30p). Autofocusing during movie recording is possible using contrast-detect AF. When the focus mode is set to full-time-servo AF (AF-F) and the AF-area mode to subject-tracking AF, the camera automatically maintains focus on a subject moving throughout the frame. The D5100 also offers in-camera movie editing functions that allow users to save a single frame as a still JPEG image or delete unnecessary portions from the beginning and/or end of movie files. the D5100 is equipped with built-in support for stereo audio recording via the Stereo Microphone ME-1 and the mode dial and live view switch have been positioned on the same spindle in consideration of operational ease.
The D5100 offers special effects that can be selected and applied with both shooting of still images and recording of movies. Special effects are displayed with the view through the lens in the monitor before shooting or recording begins, allowing users to confirm the desired results in real time. Users can easily enjoy adding special effects to movies. This mode was adopted to respond to the creative intent of users searching for a way to express their own unique style and creativity.
Nikon D5100 Spesification
Digital-SLR Nikon D5100 Spesification
- Type: Single-lens reflex digital camera
- Lens mount: Nikon F mount (with AF contacts)
- Effective pixels: 16.2 million
- Image sensor: 23.6 X 15.6 mm CMOS sensor
- image size (pixels)
4,928 X 3,264 (L)
3,696 X 2,448 (M)
2,464 X 1,632 (S)
- File format: 1) NEF(RAW), 2)JPEG, 3)NEF(RAW)+JPEG
- Media: SD (Secure Digital) memory cards *1 SDHC, and SDXC memory cards
- Frame advance rate: Up to 4 fps *2
- ISO sensitivity: ISO 100 – 6400 in steps of 1/3 EV. Can also be set to approx. 0.3, 0.7, 1, or 2 EV (ISO 25600 equivalent) above ISO 6400; auto ISO sensitivity control available
- Movie: Frame size (pixels) and frame rate :
1,280 X 720, 30 p/25 p/24 p, high/normal
640 X 424, 30 p/25 p, high/normal
- A frame rate of 30 p (actual frame rate 29.97 fps) is available when NTSC is selected for video mode. 25 p is available when PAL is selected for video mode. Actual frame rate when 24 p is selected is 23.976 fps.
- File format/Video compression: MOV, H.264/MPEG-4 Advanced Video Coding
- Audio recording device: Built-in monaural or external stereo microphone; sensitivity adjustable
- Monitor: 3-in., approx. 921k-dot (VGA), vari-angle low-temperature polysilicon TFT LCD with 170° viewing angle, approx. 100% frame coverage, and brightness adjustment
- Power source: Battery : One rechargeable Li-ion EN-EL14 battery
- AC adapter : EH-5b AC adapter; requires EP-5A power connector (available separately)
- Dimensions (approx.): (W×H × D): 128 X 97 X 79 mm
- Weight (approx.): 510 g without battery, memory card, or body cap 560 g with battery and memory card but without body cap
Saturday, April 2, 2011
What is Bokeh
Bokeh refers to the technique of blurring an image to add to the aesthetic quality of a photograph. The word bokeh, derived from the Japanese word “boke” (pronounced “bo-keh”), literally translates to ‘fuzziness’. When a photographer wants to make an image appear softer, bokeh will put the object slightly out of focus without completely destroying the integrity of it’s definition.
Often, bokeh is confused with the idea of a picture’s “sharpness.” Rather than describing the point of focus, however, bokeh is the blurring of the background or foreground.
When an image within a camera’s lens is “in focus,” the camera has positioned the image at the point where most of the light has converged on the image to a fine point. Yet, if an image appears out of focus, then the light appears as a blurred disc, rather than a focused point. To create bokeh in a picture is to put the image out of focus without making it unrecognizable.
When bokeh is used incorrectly, a picture will render a combination of sharply defined lines combined with blurriness.
To the contrary, correctly performed bokeh produces an image with no sharp edges. Instead, the fuzziness produced by bokeh suggests the image without distinct borders.
photography.com
Wednesday, March 30, 2011
Flash Photography
A flash is a device used in photography producing a flash of artificial light (typically 1/1000 to 1/200 of a second) at a color temperature of about 5500 K to help illuminate a scene. A major purpose of a flash is to illuminate a dark scene. Other uses are capturing quickly moving objects or changing the quality of light. Flash refers either to the flash of light itself or to the electronic flash unit discharging the light. Most current flash units are electronic, having evolved from single-use flashbulbs and flammable powders. Modern cameras often activate flash units automatically.
Flash units are commonly built directly into a camera. Some cameras allow separate flash units to be mounted via a standardized "accessory mount" bracket ( hot shoe ). In professional studio equipment, flashes may be large, standalone units, or studio strobes , powered by special battery packs or connected to mains power. They are either synchronized with the camera using a flash synchronization cable or radio signal, or are light-triggered, meaning that only one flash unit needs to be synchronized with the camera, and in turn triggers the other units.
As well as dedicated studio use, flash may be used as the main light source where ambient light is inadequate, or as a supplementary source in more complex lighting situations. Basic flash lighting produces a hard, frontal light unless modified in some way.Umbrellas and softboxes are commonly used for this purpose (even with small hand-held flash units).
Fill flash or "fill-in flash" describes flash used to supplement ambient light in order to illuminate a subject close to the camera that would otherwise be in shade relative to the rest of the scene. The flash unit is set to expose the subject correctly at a given aperture, while shutter speed is calculated to correctly expose for the background or ambient light at that aperture setting.
Bounce flash is a related technique in which flash is directed onto a reflective surface, for example a white ceiling or a flash umbrella , which then reflects light onto the subject. It can be used as fill-flash or, if used indoors, as ambient lighting for the whole scene.
Bouncing creates softer, less artificial-looking illumination than direct flash, often reducing overall contrast and expanding shadow and highlight detail, and typically requires more flash power than direct lighting.
Part of the bounced light can be also aimed directly on the subject by "bounce cards" attached to the flash unit which increase the efficiency of the flash and illuminate shadows cast by light coming from the ceiling. It's also possible to use one's own palm for that purpose, resulting in warmer tones on the picture, as well as eliminating the need to carry additional accessories.
Also, slave flash units exist that are set up away from the subject and camera, that are triggered by the light from the master flash. This slave flash provides fill or bounce light. Many small flashes and studio monolights have optical slaves built in. Wireless radio transmitters, such as Pocket Wizards are also popular for remote synchronization since the receiver unit can be around a corner, or well over 100 meters away (which would be far to difficult to trigger using an optical sync).
Another method that can be used is strobe. Some high end units can be set to flash a specified number of times at a specified frequency. This allows action to be frozen multiple times in a single exposure.
Colored gels can also be used to change the color of the flash. Correction gels are commonly used, so that the light of the flash would be the same as the tungsten lights (using a CTO gel) or the fluorescent lights.
Saturday, March 19, 2011
How To Take Picture On Tv With Digital Camera
If you've ever tried to take pictures directly from your television screen, you might sometimes notice a horizontal line running up and down the image. That's because the TV screen is "painted" one pixel at a time from top to bottom. The line appears on your image when you use a shutter speed is too fast and that the "freeze" lines on television pictures.
In the event we will provide a simple trick you need to know to be able to take television pictures using your digital camera. Well, just use shutter speed 1 / 30 sec.
You may want to experiment with different shutter speeds, like 1 / 15 sec, 1 / 25 sec .., (but less than 1 / 30 sec.) To see where you get the optimum quality on your TV using your digital camera. Of course, to be able to set the shutter speed on your camera, you should be able to switch to Shutter-Priority mode. shutter speed 1 / 15 sec. With 1 / 30 sec. Some of the lines seen in the larger image size. For images from the computer screen, try 1 / 20 sec. and get a meter reading directly from the screen.
Tuesday, March 8, 2011
Beauty Teaser Beginner Photographer
Communities camera users increasingly understand the importance of image in the capture and remember back. As it is, consumers are increasingly demanding high-quality image results. Especially for the special moments are rare and important in his life. At the level of demand like this, the quality of the images and the performance of a compact pocket camera that is used everyday is no longer adequate. You need entry-level digital SLR camera a sophisticated and easy to use anyone else.
"The reason is the background of Canon continues to develop a line of digital SLR cameras in entry class level.Termasuk, the launch of Canon EOS 600D and Canon EOS 1100D," said Director of Division of Canon PT Datascrip Merry Harun.
Second DSLR camera in beginner class is equipped the advanced features and excellent photo quality. Japanese manufacturers are convinced they can outperform other cameras in its class so that each user of the camera, both the general public as well as beginner photographers who tried this camera must have fallen in love with its performance. In addition to the attractive design and excellent image quality, beginner photographers will appreciate the features and superior technology on the Canon EOS 600D.
"By resolution 18-megapixel CMOS sensor and DIGIC 4 image processor, this camera to work faster in processing an image and minimize the noise that arises even at high ISO settings," said Merry.
Through features continuous shooting up to 3.7 frames / sec and start-up time is a fast, said Merry, no longer have any worries that terlewatkan.Tak important moments just that, with Intelligent Scene Picture Style Auto and Auto, the camera automatically determine the settings for lighting and the right color shades based on the type of photo shot. Be it close-up photographs, sunset photographs, as well as other photographs.
The corners of the photos taken are also more varied and creative display thanks to Vari-angle LCD monitor type size 3-inch Clear View that can be rotated to almost any direction without inhibited. Even when you're using a tripod gripatau battery though. To capture the moment a series of moves, Canon EOS 600D features high quality video recording Full HD (1920x1080) with digital zoom up to 10x to record a shot from long distance.
"Video Snapshot feature to record a series of short videos each duration 2, 4, or 8 seconds to then put together also embedded into the Canon EOS 600D," he said.
This camera is also smart to take pictures in dark and low-light conditions, without the aid of flash though. This is thanks to high ISO settings up to 12,800. And for users who enjoy sharing photos through social media, this product can automatically resize a high resolution file into JPEG format.
"Canon EOS 600D is also the first entry-level digital SLR camera featuring a built-in wireless flash transmitter, expanding the space created by the various lights flash fired from a variety of positions," he said.
Canon EOS 1100D brings continuous shooting speed of 3 frameper seconds until the memory card is full (in JPEG format), and high ISO settings up to 6400.
source : okezone
Monday, March 7, 2011
Focus Area Mode In Photography
Single point [[]]
In this mode camera can focus on the subject in the selected focus point only. used with static subjects. to select the focus point to use the multi selector.
Dynamic area [{}]
In focus mode AF-A and AF-C. users can select the focus point manually. but the camera will focus based on information from a point in the vicinity if the subject immediately leave the selected focus point. Used for moving subjects were irregular. In AF-S focus mode, the user can select the focus point manually. The camera can focus on the subject in the selected focus only.
Area-automatic [-]
On Area-automatic mode the camera will automatically detect the subject and select the focus point.
3D [3D]
In Focus mode AF-A and AF-C, the user can select the focus point using the multi selector. When the subject moved after the camera focus, the camera can use 3D tracking to choose a new focal point and keeping the focus locked on the subject of the original while the shutter release button is pressed half. when the subject left the viewfinder, your finger off the shutter release button and reset your photos with the subject in the selected focus point.
In this mode camera can focus on the subject in the selected focus point only. used with static subjects. to select the focus point to use the multi selector.
Dynamic area [{}]
In focus mode AF-A and AF-C. users can select the focus point manually. but the camera will focus based on information from a point in the vicinity if the subject immediately leave the selected focus point. Used for moving subjects were irregular. In AF-S focus mode, the user can select the focus point manually. The camera can focus on the subject in the selected focus only.
Area-automatic [-]
On Area-automatic mode the camera will automatically detect the subject and select the focus point.
3D [3D]
In Focus mode AF-A and AF-C, the user can select the focus point using the multi selector. When the subject moved after the camera focus, the camera can use 3D tracking to choose a new focal point and keeping the focus locked on the subject of the original while the shutter release button is pressed half. when the subject left the viewfinder, your finger off the shutter release button and reset your photos with the subject in the selected focus point.
Monday, February 28, 2011
Panning Technique Photography
Panning is to blur the background but the object remains in focus. in photography panning typically indicates fast motion. panning word comes from the word panorama was originally created in 1877 by robert barker.

Panning photographing way is to adopt a speed of about 1 / 15, 1 / 30, 1 / 80 depending on the speed of the object to be photographed, while we follow the movement of the object image, when the object has reached the place we want to click the shutter while following the object movement.

The faster the shutter speed allowed by the fast-moving subjects easier to catch the highlight shots current. With slower moving subjects, the risk is that the panning motion will beef jerky, and too difficult to keep the subject in the same position of the frame for a long period.

To assist in capturing images highlight, photographers using instruments such as a tripod and monopod, which makes it easy to swing the camera along one plane, while maintaining stable in the other. A low budget option is to tie a rope around the lens, then to drop the other into the floor and step on it to pull it taut. This will allow a little bit more stability and allows for smooth blur
Friday, February 25, 2011
Introduction of The Symbol P, S, A and M on Nikon D3000 SLR Cameras
P = automatic programmable
camera set shutter speed and aperture for optimal lighting. recommended for shooting and in other situations where there is no time to set the camera
camera set shutter speed and aperture for optimal lighting. recommended for shooting and in other situations where there is no time to set the camera

S = automatic shutter priority
users choose the shutter speed, camera selecting aperture for best results. used to freeze or blur motion.
A = aperture priority auto
the user selects the aperture; camera choose the shutter speed for best results. used to blur the background and focus to the foreground and background at the same time
M = Manual
users can control shutter speed and aperture. set the shutter speed to "bulb" (custom shutter speed) or "time" for a long time lighting
100 Digital SLRs here

Nikon D3000 10.2MP Digital SLR Camera with 18-55mm f/3.5-5.6G AF-S DX VR Nikkor Zoom Lens

Nikon D3100 14.2MP Digital SLR Camera with 18-55mm f/3.5-5.6 AF-S DX VR Nikkor Zoom Lens

Nikon 55-200mm f/4-5.6G ED IF AF-S DX VR [Vibration Reduction] Nikkor Zoom Lens

Subscribe to:
Posts (Atom)